Monday, 19 February 2018
Wednesday, 7 February 2018
Wednesday, 5 June 2013
IBM Worklight Integration with Websphere Message Broker
In this tutorial we will learn about How integrate IBM Worklight 5.0.6 to IBM Websphere Message Broker.
Worklight + Message Broker

WebSphere Message Broker
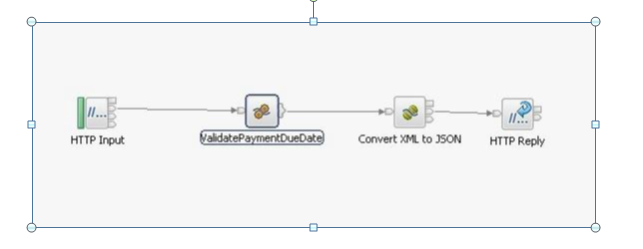
Request Processing
- Initiated by sending a request to Message Broker from Worklight.
- Message Broker receives request in XML format
- Message Broker checks that whether Bill Due date has been passed or not.
- If bill due date is greater or equal than today’s date, then It will send verification message to the Worklight otherwise a message will be sent to the Worklight indicating that bill could not be processed.
- Broker will create a JSON response for these messages and then will be sent back to Worklight for further processing.
Request
<PaymentDetails>
<BillNumber>034532367</BillNumber>
<CustomerName>Sajjad Haider </CustomerName>
<BillDueDate>2013-06-03</BillDueDate>
<BillAmount>250 </BillAmount>
</PaymentDetails>
Successful Response
{"Message":
{"Status":"Your Payment is validated successfully and \n transaction is processed with bill amount : 250 “
}
}
Failure response
{"Message":
{"Status":"Your Payment validation failed, \n the due date is expired.250 “
}
}
1)Creating Worklight Project

2)Creating http Adapter
Create HTTP Adapter named HTTPAdapterForBillPayment after creation edit the following filesi) HTTPAdapterForBillPayment.xml add following entries
<protocol>http</protocol>
<domain>192.168.48.70</domain>
<port>7080</port>
<!-- Following properties used by adapter's key manager for choosing specific certificate from key store
<sslCertificateAlias></sslCertificateAlias>
<sslCertificatePassword></sslCertificatePassword>
-->
</connectionPolicy>
<loadConstraints maxConcurrentConnectionsPerNode="2" />
</connectivity>
<procedure name="getPaymentDetailsAdapter"/>

ii) HTTPAdapterForBillPayment-impl.js
Add below function in this filefunction getPaymentDetailsAdapter(name, billNumber, billDueDate, billAmount) {
//var name="sajjad";
//var billNumber="12345";
//var billDueDate='2013-06-03';
//var billAmount=250;
var inputMessage = '<PaymentDetails>' + ' <Name>' + name + '</Name>'
+ ' <BillNumber>' + billNumber + '</BillNumber>' + ' <BillDueDate>'
+ billDueDate + '</BillDueDate>' + ' <BillAmount>' + billAmount
+ '</BillAmount>' + '</PaymentDetails>';
/*
* Construct Input object with post method which is to sent
*/
var input = {
method : 'post',
returnedContentType : 'json',
path : 'workApp',
body : {
content : inputMessage.toString(),
contentType : 'workApp/xml'
}
};
WL.Logger.debug("@@@" + input);
/*
* Send input to HTTP Server hosted by Message Broker and wait for response.
*/
response = WL.Server.invokeHttp(input);
return response;
WL.Logger.debug("@@@" + response);
var type = input;
if ("object" == type) {
if (true == response)
{
// Drill down into the response object.
var results = response;
var result = results[0];
WL.Logger.debug("@@@ result " + result);
return result; // sent the result received from Broker to mobile
// app client
}
}
}
3)Consuming Json data returned by Http Adapter
Adding functionality in to app so that we can consume the json data returned by http Adapter i)Editing common/.html
<section id="container">
<h2> Financial Bill Payment</h2>
<form name="BillPaymentApp" id="web-form">
<div id="wrapping" class="clearfix">
<section id="aligned">
<input type="text" name="txtName" id="name" placeholder="Your name" autocomplete="off" tabindex="1" class="txtinput">
<input type="text" name="txtBillNumber" id="bill-number" placeholder="Bill Number" autocomplete="off" tabindex="2" class="txtinput">
<input type="text" name="txtBillDueDate" id="bill-duedate" placeholder="Bill Due Date(yyyy-mm-dd)" autocomplete="off" tabindex="3" class="txtinput">
<input type="text" name="txtAmount" id="amount" placeholder="Amount" tabindex="4" class="txtinput">
</div>
<section id="buttons">
<input type="cancel" name="cancel" id="cancelbtn" class="cancelbtn" value="Cancel" onClick="">
<input type="button"name="submit" id="submitbtn" class="submitbtn" value="Submit" onClick="getPaymentDetails()"> <br style="clear: both;">
</section>
</form>
</section>
</section>
ii)Editing common/js/WLMessageBrokerApp.js
var busyIndicator = null;
function wlCommonInit() {
busyIndicator = new WL.BusyIndicator('container');
}
function getPaymentDetails() {
var name, billNumber, billDueDate, billAmount;name= $('#name').val();
billNumber = $('#bill-number').val();
billDueDate =$('#bill-duedate').val();
billAmount = $('#amount').val();
//name= 'sajjad';
//billNumber ='12345';
//billDueDate ='2013-06-16';
//billAmount ='250';
var invocationData = {
adapter : "HTTPAdapterForBillPayment",
procedure : "getPaymentDetailsAdapter",
parameters : [ name, billNumber, billDueDate, billAmount ]
};
WL.Client.invokeProcedure(invocationData, {
onSuccess : getStatusDetailsSuccess,
timeout : 500000,
onFailure : function() {
//alert('Payment Request Failed for bill number ' + billNumber
// + ' Name : ' + name);
simpleDialogDemo('Payment Request Failed for bill number ' + billNumber
+ ' Name : ' + name);
}
});
}
function getStatusDetailsSuccess(result) {
console.log("Entering getPaymentDetailsSuccess");try {
if (result.status == 200) {
var response1 = result.invocationResult;
//alert("Status : " + response1.Message.Status);
simpleDialogDemo("Status :" + response1.Message.Status);
/*var msg = res.get("Message");
var billNumber = msg.get("billNumber");
$('#billNumber').value = response1.Data.Message.billNumber;*/
}
} catch (e) {
busyIndicator.hide();
}
busyIndicator.hide();
}
var dialogTitle = "Detail";
var dialogText = ttext ;
WL.SimpleDialog.show(dialogTitle, dialogText, [ {
text : 'Ok',
handler : simpleDialogButton1Click
}
]);
}
function simpleDialogButton1Click() {
}
4)Deploying Adapter & App folder to Server
Deployee Adapter

Deployee App

5)Its time to run app on simulator
Thank You
Wednesday, 29 May 2013
IBM Worklight PhoneGap BarcodeScanner + QR Code Scanner
In this article we will learn how to integrate IBM Worklight 5.0.6 + PhoneGap BarcodeScanner functionality,Following steps are given.
Make sure downloading iOS/ChildBrowser
download the ChildBrowser Plugins from https://github.com/phonegap/phonegap-plugins/tree/master/iOS/BarcodeScanner
or
download folder phonegap-plugins-master and locate
phonegap-plugins-master\phonegap-plugins-master\iOS\BarcodeScanner(recommended).
1)Create Worklight Project + app like

2) In common/WLBarcodeApp.html add code
<button onclick="barcodeScan();">Barcode Scan</button>
<div id="mydiv">
</div>

$('#mydiv').html('');
window.plugins.barcodeScanner.scan(
function(result) {
$('#mydiv').html('Barcode: '+result.text);
});
}
 4)After creation of Worklight Project and application locate Project/apps/common and right click New Worklight Environment checked iPhone and finish.
From the downloaded files
a)Copy barcodescanner.js into common/js/
b)Copy 1)CDVBarcodeScanner.mm 2)scannerOverlay.xib 3)zxing-all-in-one.cpp 4)zxing-all-in-one.h into iPhone/native/Classes/ it will looks like

<plugin name="org.apache.cordova.barcodeScanner" value="CDVBarcodeScanner" />
</plugin>
<header-file src="zxing-all-in-one.h" />
<source-file src="CDVBarcodeScanner.mm" />
<source-file src="zxing-all-in-one.cpp" />
<framework src="libiconv.dylib" />
<framework src="AVFoundation.framework" />
<framework src="AssetsLibrary.framework" />
<framework src="CoreVideo.framework" />
</platform>.


 7)After successfully imported Worklight project in Xcode environment select the top of the project and select add to

select classes from window 1)CDVBarcodeScanner.mm 2)scannerOverlay.xib 3)zxing-all-in-one.cpp 4)zxing-all-in-one.h then press add button.


Make sure downloading iOS/ChildBrowser
download the ChildBrowser Plugins from https://github.com/phonegap/phonegap-plugins/tree/master/iOS/BarcodeScanner
or
download folder phonegap-plugins-master and locate
phonegap-plugins-master\phonegap-plugins-master\iOS\BarcodeScanner(recommended).
1)Create Worklight Project + app like
2) In common/WLBarcodeApp.html add code
<button onclick="barcodeScan();">Barcode Scan</button>
<div id="mydiv">
</div>

3)In common/js/WLBarcodeApp.js add following function
function barcodeScan()
{$('#mydiv').html('');
window.plugins.barcodeScanner.scan(
function(result) {
$('#mydiv').html('Barcode: '+result.text);
});
}

From the downloaded files
a)Copy barcodescanner.js into common/js/
b)Copy 1)CDVBarcodeScanner.mm 2)scannerOverlay.xib 3)zxing-all-in-one.cpp 4)zxing-all-in-one.h into iPhone/native/Classes/ it will looks like

5)In IBM Worklight 5.0.6 version provide config.xml file, Located in iPhone/native/config.xml add the following entries
<plugin>
<plugin name="BarcodeScanner" value="CDVBarcodeScanner" /><plugin name="org.apache.cordova.barcodeScanner" value="CDVBarcodeScanner" />
</plugin>
After </plugin> head insert below code
<platform name="ios"> <plugins-plist key="BarcodeScanner" string="CDVBarcodeScanner" />
<resource-file src="scannerOverlay.xib" /> <header-file src="zxing-all-in-one.h" />
<source-file src="CDVBarcodeScanner.mm" />
<source-file src="zxing-all-in-one.cpp" />
<framework src="libiconv.dylib" />
<framework src="AVFoundation.framework" />
<framework src="AssetsLibrary.framework" />
<framework src="CoreVideo.framework" />
</platform>.


6) Now its time to playing in xcode environment just right click the iPhone Generated environment and select run as Xcode project


select classes from window 1)CDVBarcodeScanner.mm 2)scannerOverlay.xib 3)zxing-all-in-one.cpp 4)zxing-all-in-one.h then press add button.

8.Another most important step is to add library files into project for this Select Project Targets Build Phases Link Binary with Libraris and locate + sign and add following four libraries one by one
AssetsLibrary.framework, AVFoundation.framework, CoreVideo.framework, libiconv.dylib.


Its time to run on device here are the screens that show the running
run time screen

Final Screen

Thank You,
Best Regards,
Sajjad Hussain
Monday, 29 April 2013
Adding functionality of ChildBrowser Plugin in IBM Worklight Project
Steps to be followed
1. Make sure downloading iOS/ChildBrowser
download the ChildBrowser Plugins from https://github.com/phonegap/phonegap-plugins/tree/master/iOS/ChildBrowser
or
download folder phonegap-plugins-master and locate
phonegap-plugins-master\phonegap-plugins-master\iOS\ChildBrowser(recommended).
2. After downloading files Create folder named Plugins and add below files
- ChildBrowserCommand.h
- ChildBrowserCommand.m
- ChildBrowserViewController.h
- ChildBrowserViewController.m

4.Add ChildBrowser.js from downloaded file in to worklight js folder of the project and add coding to html file that load the google page in.
<body id="content" style="display: none">
WLChildBrowserApp
<button id="cb">Show Google url webPage</button>
<script>
document.getElementById("cb").addEventListener("click", function() {
ChildBrowser.install(); window.plugins.childBrowser.showWebPage('http://www.google.com');
});
</script>
<script src="js/initOptions.js"></script>
<script src="js/WLChildBrowserApp.js"></script>
<script src="js/messages.js"></script>
</body>
After changes the files will be looks like that

5. Deployee app and generate new Environment for iPhone then Run As Xcode by right clicking iPhone icon
6. Drag the Plugins folder that created in step-2 in to Xcode project and also drag remaining files like ChildBrowserViewController.xib and ChildBrowser.bundle into Resource folder of the Xcode Project, its looks like below

7. Add Following entries in cordova.plist file under (in version 5.0.5)
- ExternalHost add value *
- add Key ChildBrowserCommand and Value ChildBrowserCommand
- add key ChildBrowser and value ChildBrowser.js

<plugins>
<!-- Cordova -->
<plugin name="ChildBrowser" value="ChildBrowser.js" />
<plugin name="ChildBrowserCommand" value="ChildBrowserCommand" />
<plugin name="Device" value="CDVDevice" />

8. Try to test app on simulator u will see the below error.

9. Locate Targets Build Phases compile sources and now press (+) sign add and locate Add Other now a window will appear and again select all
- ChildBrowserCommand.h
- ChildBrowserCommand.m
- ChildBrowserViewController.h
- ChildBrowserViewController.m


Subscribe to:
Comments (Atom)